Telecom Regulatory Authority of India (TRAI) has announced new Telecom Commercial Communications Customer Preference Regulations (TCCCPR) in July'19 2018 which was updated again on Dec'21 2018, to combat unsolicited commercial communication and maintain transparent system in the Indian telecom industry. This will help further secure subscriber privacy and mitigate fraudulent activities and control Unsolicited Commercial Communication (UCC)
Distributed Ledger Technology (DLT) will introduce Block chain technology for Operators; this is a change that will help maintain uniformity amongst all operators. In adherence to the upcoming regulations, all businesses/enterprises will be required to register their companies will now have to register themselves with Telecom Operators for sending SMS using their company documentation.. The Businesses (Principle Entity) and Service Provider (Telemarketers) will be accountable to telecom operators who will be directly accountable to TRAI.
DLT implementations were about uniformity of information to enhance trustworthy ecosystem, Entity registration is mandatory for all companies intending on sending messages via individual operators that are a part of the DLT ecosystem.
We would like to assist you here with all the steps across respective operators to mitigate any concerns of entity registration
The Entity Registration processes as per operators are as follows
Registration with Airtel
-
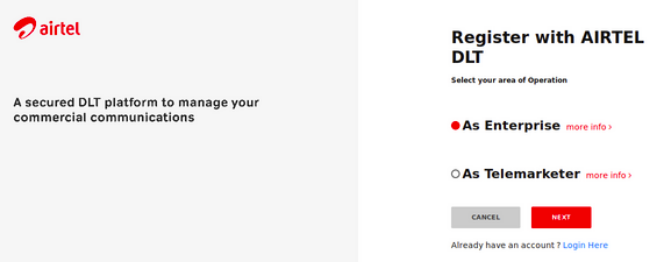
Open the link - https://dltconnect.airtel.in/signup/. The below show page would appear.
-
Click on Principal Entity and then select New Registration as shown below:
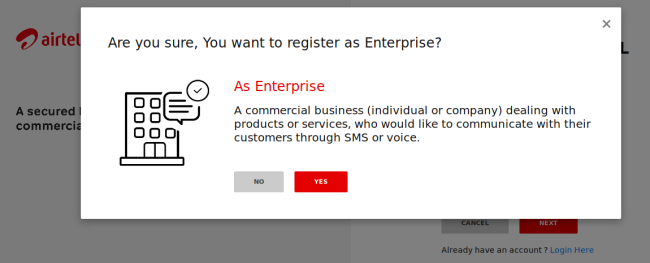
- In the page shown below, if you have NOT registered with any other operator, select "No" and proceed.
-
If already registered with other operators, please select "Yes" and enter the entity ID
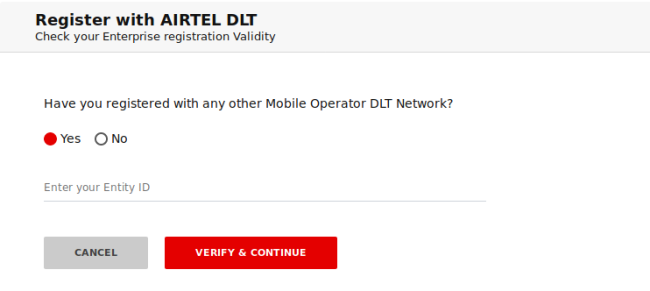
- In the page that appears, as shown below, fill in the details and upload the documents requested.
-
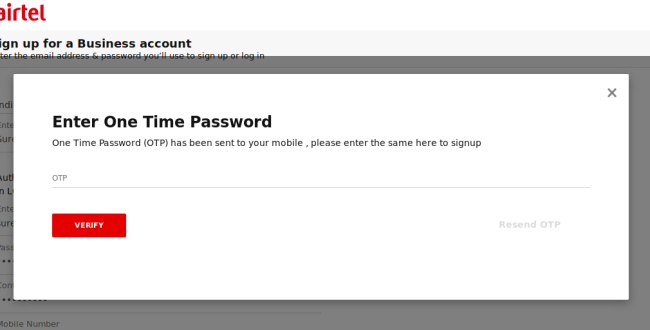
Once done, click submit and you should receive an acknowledgement as shown below if all the details are correctly entered.
-
One email will be received post this for the successful completion of the registration.

Registration with BSNL
-
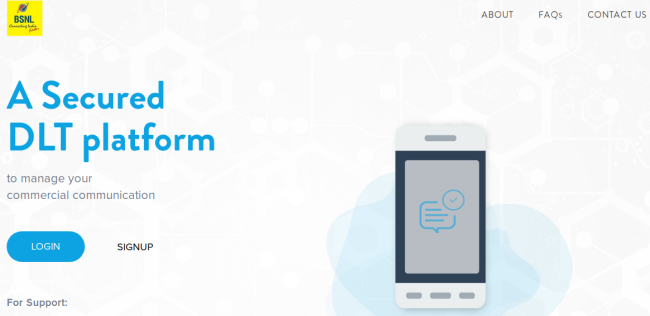
Open the link https://www.ucc-bsnl.co.in/signup/. The below show page would appear.
-
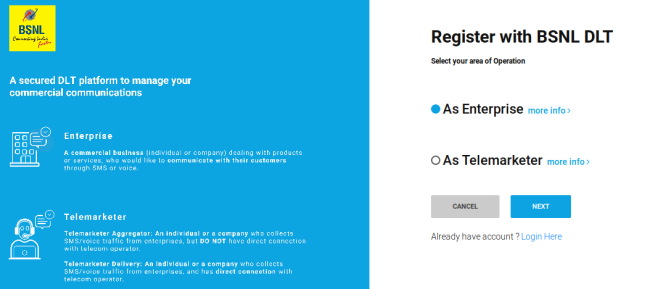
Click on Principal Entity and then select New Registration as shown below:
- In the page shown below, if you have NOT registered with any other operator, select "No" and proceed.
-
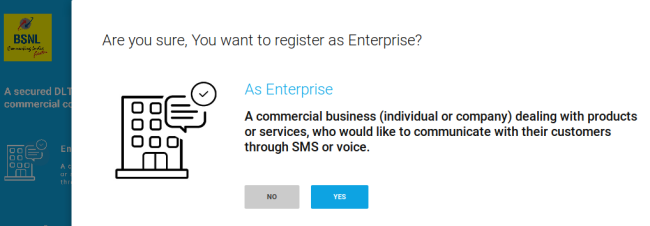
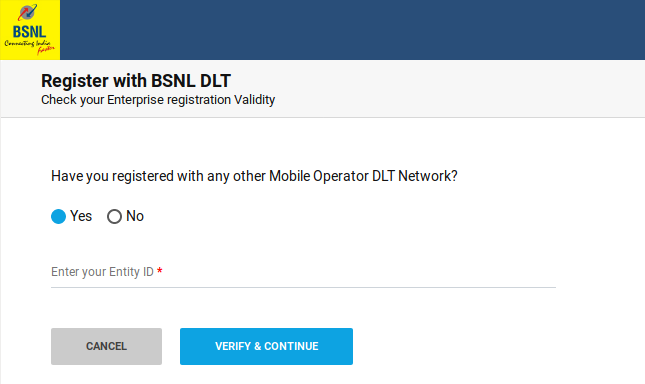
If already registered with other operators, please select "Yes" and enter the entity ID
-
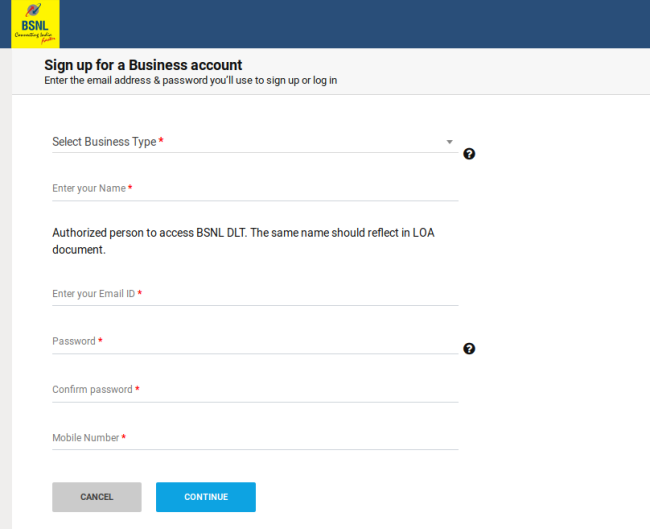
In the page that appears, as shown below, fill in the details and upload the documents requested.
-
Once done, click submit and you should receive an acknowledgement as shown below if all the details are correctly entered.
-
One email will be received post this for the successful completion of the registration

Registration with JIO
-
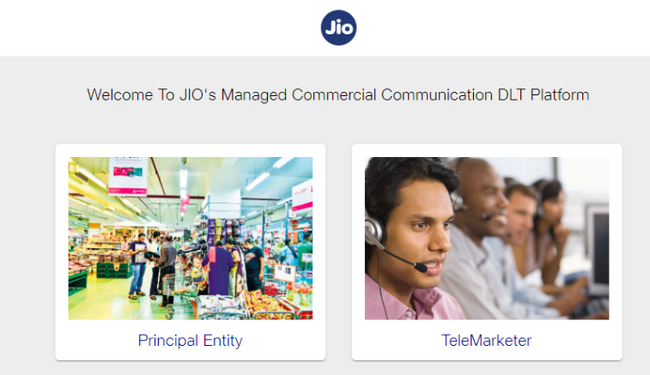
Open the link - https://trueconnect.jio.com/#/. The below show page would appear.
-
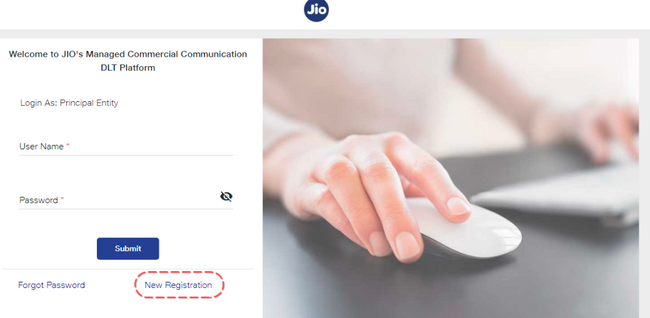
Click on Principal Entity and then select New Registration as shown below:
-
In the page shown below, if you have NOT registered with any other operator, select No and proceed

-
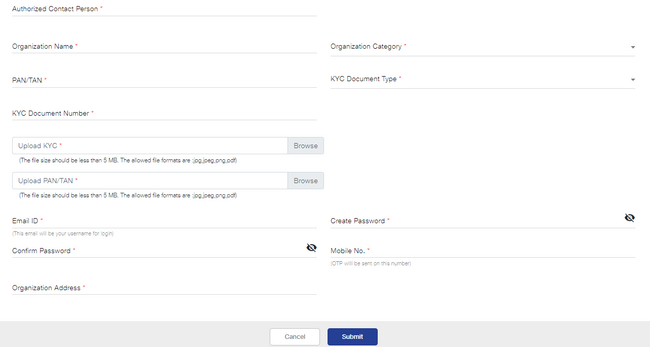
In the page that appears, as shown below, fill in the details and upload the documents requested.
-
Once done, click submit and you should receive an acknowledgement as shown below if all the details are correctly entered.
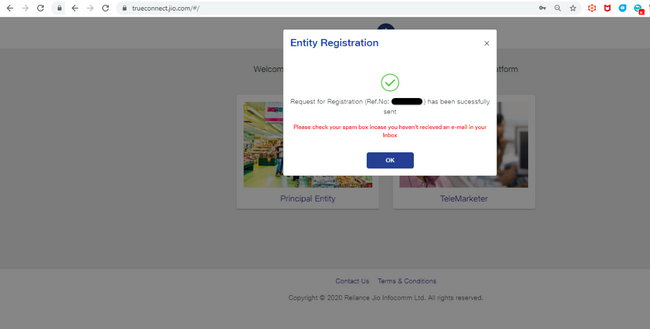
- Two emails will be received post this, one for the acknowledgement of the registration competition and another one is for successful confirmation of registration.
- In case there are any concerns with the documentation, then an email with rejection details will be shared, at which point, re-registration is required.
- Enter the corporate email Id
- Provide valid details of the organization - business PAN, complete address, details of authorized person (mobile no. & email ID)
- Attach/upload the valid proofs for PAN & Proof of address as stated in the details entered
- On successful registration, the details provided & supporting proofs provided for the Entity will be validated by the Principal Entity within 3-7 working days
- Request will be Approved/Sent for Modification/Rejected by the registrar & Entity will be intimated accordingly on the registered email Id
- On approval the Principal Entity will be registered and a unique Entity ID will get generated which can be used for further communications by the PE
- In case of any discrepancy, i.e. missing document or incorrect details, same will be duly intimated on the registered e-mail and mobile number in the defined TAT
- Post Principal Entity activation, each Principal Entity can login to the portal and carry out its functions as per business requirement
- In case the Entity request gets rejected due to deficiency in documents, Principal Entity can re-initiate the request after correction of details
- Govt. registered entity - PAN or TAN along with an address proof, Letter of Intent / Agreement issued by the Govt. of India or State Govt.
- SEBI registered Entity - PAN, Certificate of registration issued by SEBI and address Proof
- Others, Private or Public Limited - PAN & Address Proof (GST certificate, COAI ...etc.)
Registration with PingConnect (Videocon)
-
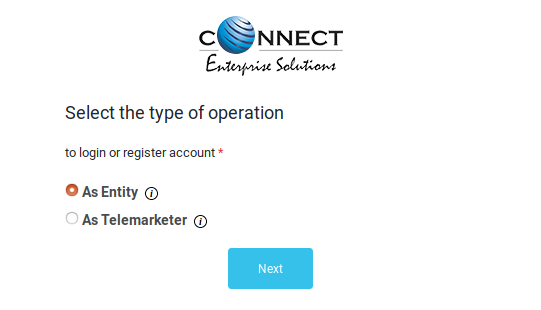
Open the link - https://pingconnect.in/entity/register-with. The below show page would appear.
-
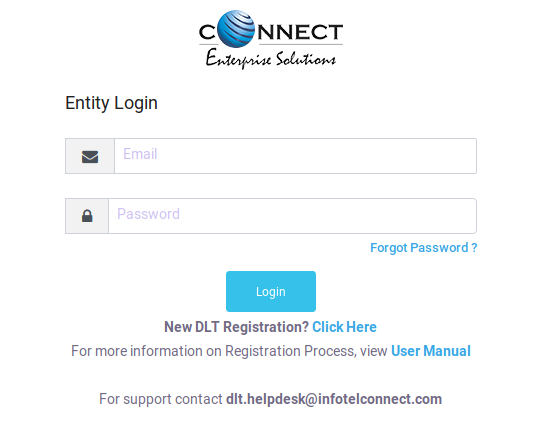
Please select as shown below:
-
If you are an Indian/Overseas Company Select the relevant option and proceed as per below:
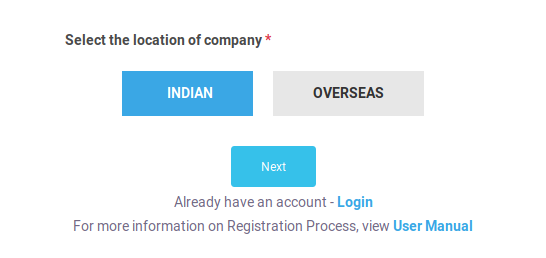
- If you are using this website to register for the first time then at this point, please select "New Entity".
-
In case you have already registered using another website already, then select "Enroll Entity".
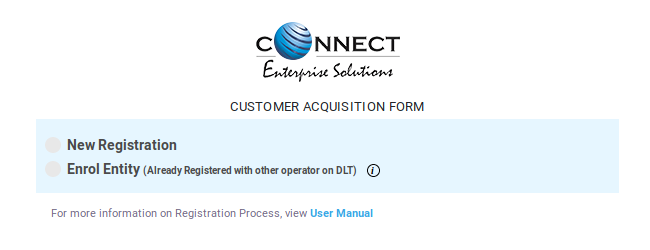
-
Regardless of the option chosen, please fill in the details as shown and proceed.
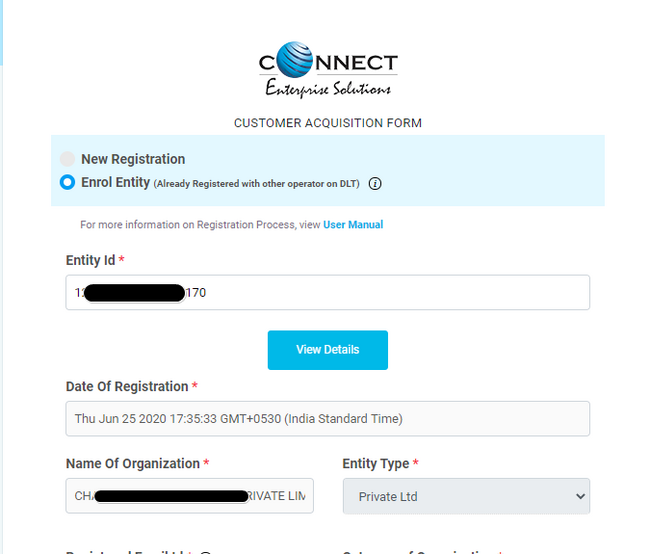
- In case of new registration, in case prompted for amount to pay, please enter 00 and proceed.
-
A pop up as shown below will still appear. Donât worry about it. The process is free of cost. Please click okay and proceed.
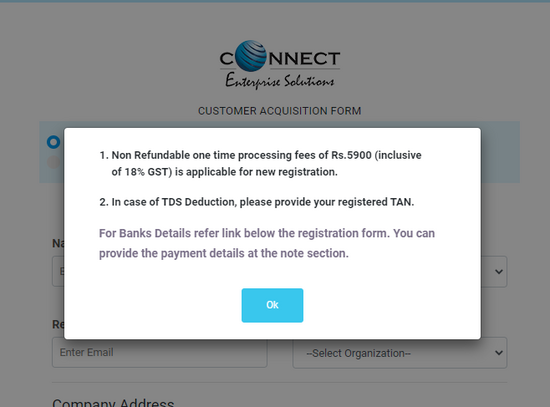
- Once all the details are updated and the form is submitted, and OTP will be first sent to verify the mobile number you have registered with.
-
Once this is complete, you would receive an acknowledgement as below:
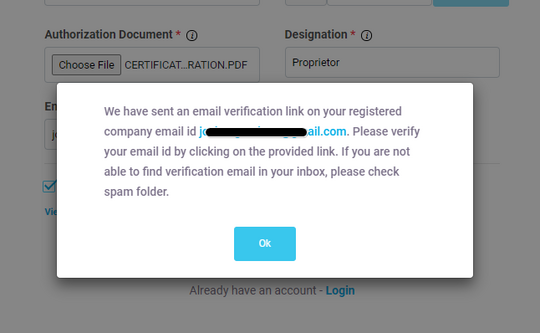
-
Below is a sample of the email received post completion of the registration process to the registered email ID:
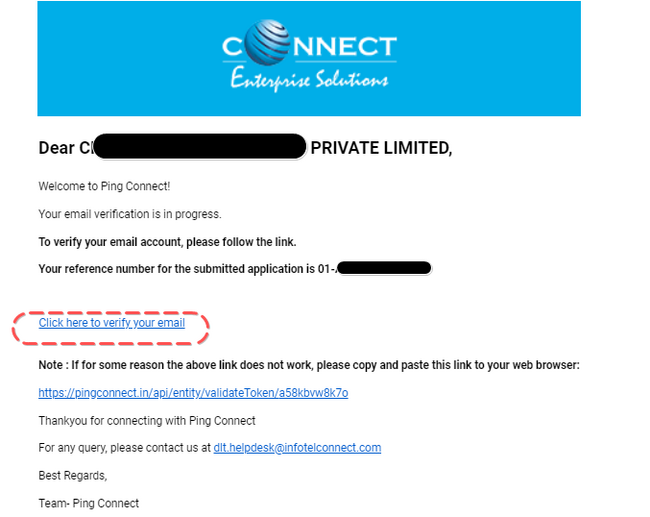
- Follow the link to verify the email.
- Within 24 to 48hrs, the account will be activated.
Registration with Vodafone-Idea
-
Open the link https://www.vilpower.in/. The below show page would appear.
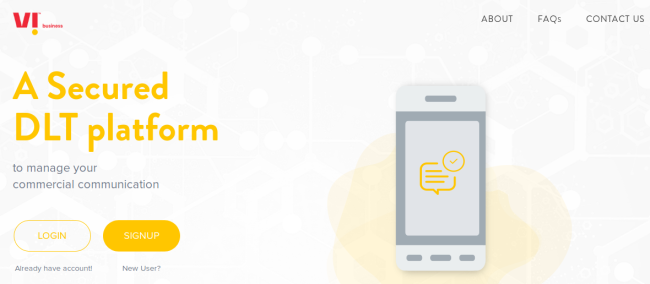
-
Click on Principal Entity and then select New Registration as shown below:
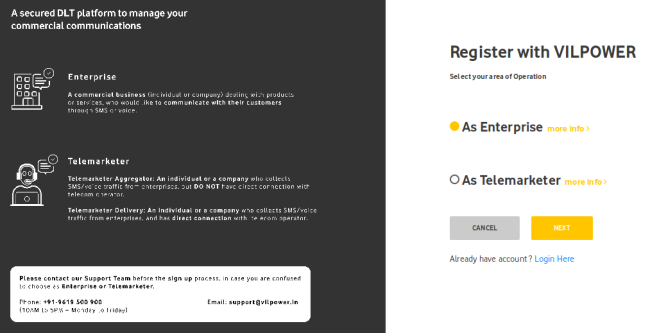
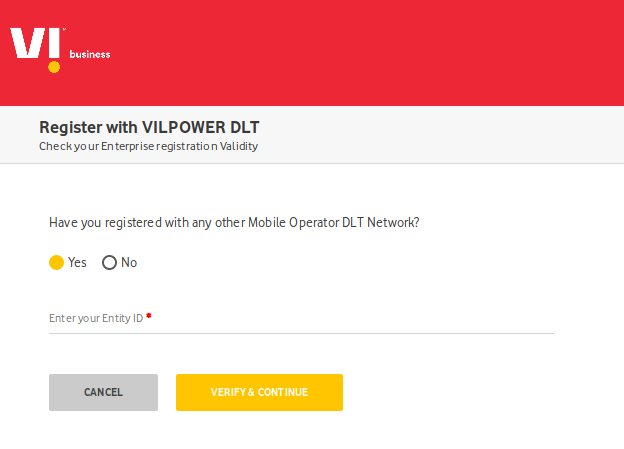
- In the page shown below, if you have NOT registered with any other operator, select "No" and proceed.
-
If already registered with other operators, please select "Yes" and enter the entity ID
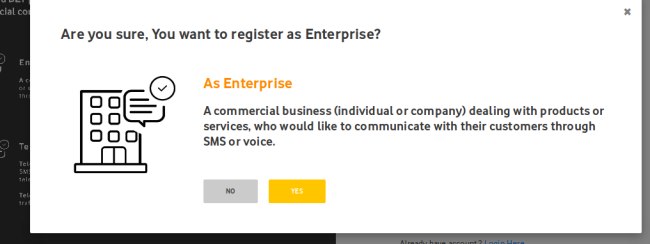
-
In the page that appears, as shown below, fill in the details and upload the documents requested.
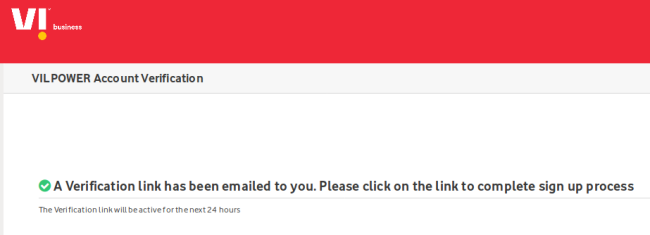
- Once done, click submit and you should receive an acknowledgement as shown below if all the details are correctly entered.
-
One email will be received post this for the successful completion of the registration
Sender ID is also known as Mask /Header. This is one of the most important parts in DLT registration process on the operator platforms.
You will need to have done the initial entity registration across operators to do the Sender ID registration. Sender ID for Transactional, Service Implicit /Explicit will be alphabetical and for Promotional will be Numeric. All Sender ID have to be registered on operator DLT platform
Once the Entity is registered and you have successfully received the Entity ID, you can go ahead with the registration of your sender IDs across any of the operators as mentioned below:
Airtel Header/Sender ID Registration Process
- Login to the Airtel DLT Portal using Telemarketer/Principal Entity login credentials.
- Select SMS Headers and then select "Add Header" in header page.
- Fill the requisite details such as content category, sender ID / header and provide details of sender.
- Submit the request for approval and make payment through available payment modes.
- Header registrar will validate and verify details provided by the telemarketer/Principal Entity within 60 minutes.
- On successful registration, the registrar will approve and register the requested sender ID in the DLT Platform.
- The Registrar Team will also communicate unsuccessful registration or any discrepancy i.e. missing document or incorrect details with the applicant via the registered e-mail and mobile number within 72 hours from the time of registration.
BSNL Header/Sender ID Registration Process
- Login to the BSNL DLT Platform using Telemarketer/Principal Entity login credentials
- Select SMS Headers and then select "Add Header" in header page.
- Fill the requisite details such as content category, sender ID / header and provide details of sender.
- Submit the request for approval and make payment through available payment modes.
- Header registrar will validate and verify details provided by the telemarketer/Principal Entity within 60 minutes.
- On successful registration, the registrar will approve and register the requested sender ID in the DLT Platform.
- The Registrar Team will also communicate unsuccessful registration or any discrepancy i.e. missing document or incorrect details with the applicant via the registered e-mail and mobile number within 72 hours from the time of registration.
Jio Header/Sender ID Registration Process
Every Company needs to register header with access providers as per the procedure below:
- Login to Trueconnect.jio.com using Principal Entity login credentials.
-
Go to SMS headers-> Header SMS Registration.

-
Fill the required details such as header type and category. Create the required Header
and click on Submit.
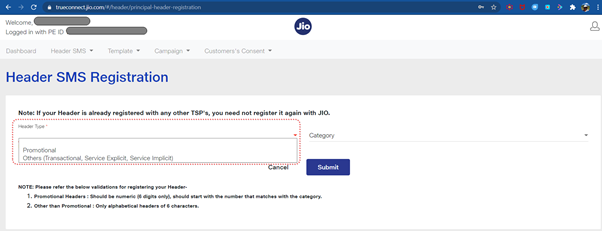
-
Submit the request for approval.
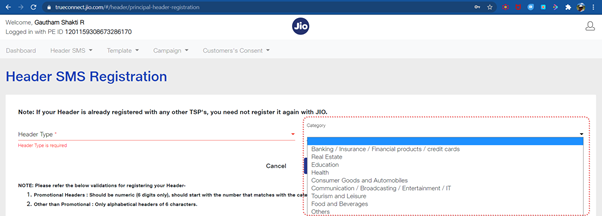
- JIO's Registrar will validate and verify details provided by the Principal Entity.
-
After validating the details the Registrar will approve, register the header on the DLT
Platform.
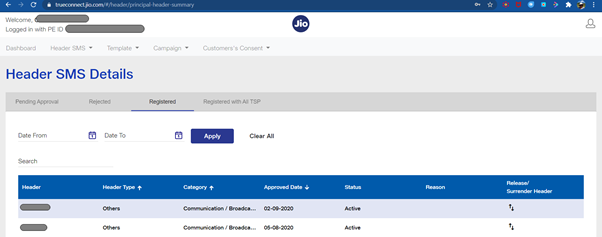
- The Registrar will then communicate successful registration or any discrepancy to the Principal Entity on the registered e-mail and mobile number.
- The registrar function will communicate successful registration or any discrepancy i.e. missing document or incorrect details with the applicant on the registered e-mail and mobile number in the defined TAT
Tata Header/Sender ID Registration Process
Sender ID/Header is a unique 6 characters alpha or 6 characters numeric string (depending of the entity type) assigned to a business or legal Entity for sending commercial communication.- Login to the Tata DLT platform using Principal Entity login credentials.
- Go to SMS headers-> Add header in header page.
- Fill the requisite details such as header category, Header type, sender ID / header and provide details of sender, provide supporting documents & justification for header.
- The Header requested for should be for the Entity itself & not for any other entity. Also, there should be a relation between the Header & the Entity's name, line of business, brand etc.
- Submit the request for approval and make payment through available payment modes.
- Header registrar will validate and verify details provided by the Principal Entity within 2 working days
- On successful registration, the registrar will action (approve/reject), register the Header on the DLT Platform
- The registrar function will communicate successful registration or any discrepancy i.e. missing document or incorrect details with the applicant on the registered e-mail and mobile number in the defined TAT
Videocon Header/Sender ID Registration Process
All customers are required to register sender IDs/Headers with the operators for smooth delivery of messages.
- First, you'll need to log into the portal: https://pingconnect.in/
-
Once logged in, click Header on left navigation bar to see the detailed view of all the
Headers. Select new header to add a new one
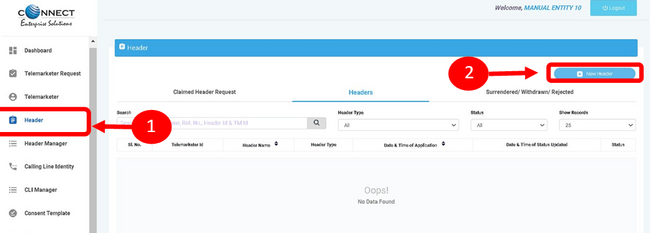
- Click Single to create a New Single Header and select the other fields.
-
Click on Header Type to choose the type of header from the list.

-
Select the Category that best fits your business for which the header will be used for.

- Provide a name for the header.
- Click on check status to see the availability of the applied for Header/Sender ID
-
Select the relevant document for the applied header and request for OTP. Once the OTP is
verified, click on Submit
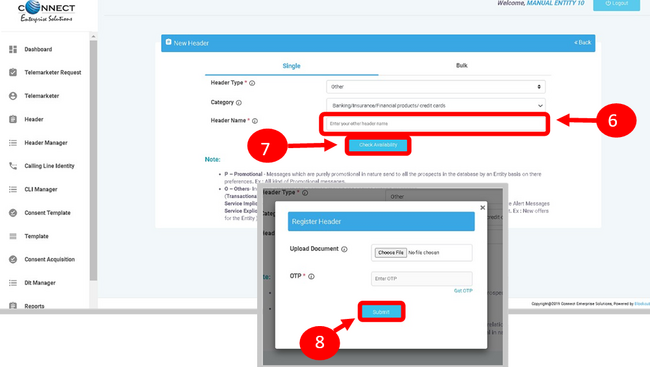
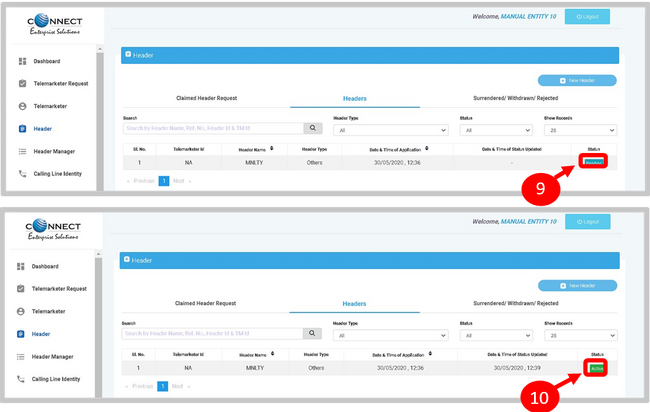
- On submission the header will show up as Pending. This will be reviewed by the Registrar Team and an update will be provided via email or call in case there is any documents missing or discrepancies for the header submitted.
-
Once the header is approved, the status will change from Pending to Approved.
Vodafone-Idea Header/Sender ID Registration Process
Every principal entity need to register header with access providers as per the procedure below:- Login to the VILPower Portal Portal using Telemarketer/Principal Entity login credentials.
- Select SMS Headers and then select "Add Header" in header page
- Fill the requisite details such as content category, sender ID / header and provide details of sender.
- Submit the request for approval and make payment through available payment modes.
- Header registrar will validate and verify details provided by the telemarketer/Principal Entity within 60 minutes.
- On successful registration, the registrar will approve and register the requested sender ID in the DLT Platform.
- The Registrar Team will also communicate unsuccessful registration or any discrepancy i.e. missing document or incorrect details with the applicant via the registered e-mail and mobile number within 72 hours from the time of registration.
Template registration with the DLT Platform is a mandatory process and this needs to be done by every client intending on executing messages to their clients. Every Template needs to be mapped to at least one Sender Id.
In order to register the Template you will first need to have done the Entity /Sender ID Registration with the operators.
The Template registration process is quite simple across operators and you can find the guide for each operator below:
Airtel Content Template Registration Process
It is required to register content template on DLT platform to acquire consent from new subscribers prior to transmission of commercial communication.
- Login to the Airtel DLT Portal using Telemarketer/Principal Entity login credentials/li>
- Go to Content template and select "Add new template"
- Define template type - Promotional/Transactional/Service
- Select category of content and a registered header
- Provide content for fixed part and demarcate variable content in the template using insert variable button
- Submit template for verification
- Content template registrar will validate and verify details provided by you within 60 minutes
- On successful registration, the Content template registrar will approve and register consent template ID on DLT platform
- The Registrar Team will communicate successful registration and any unsuccessful submissions in case of incorrect details with the applicant on the registered e-mail and mobile number within 72 hours of registration.
BSNL Content Template Registration Process
It is required to register content template on DLT platform to acquire consent from new subscribers prior to transmission of commercial communication.
- Login to the BSNL DLT Portal using Telemarketer/Principal Entity login credentials
- Go to Content template and select "Add new template"
- Define template type - Promotional/Transactional/Service
- Select category of content and a registered header
- Provide content for fixed part and demarcate variable content in the template using insert variable button
- Submit template for verification
- Content template registrar will validate and verify details provided by you within 60 minutes
- On successful registration, the Content template registrar will approve and register consent template ID on DLT platform
- The Registrar Team will communicate successful registration and any unsuccessful submissions in case of incorrect details with the applicant on the registered e-mail and mobile number within 72 hours of registration.
Jio Content Template Registration Process
-
Login to TrueConnect.jio.com as Principal Entity

-
Go to template -> content template registration
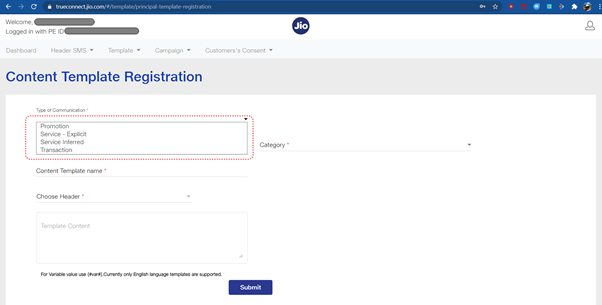
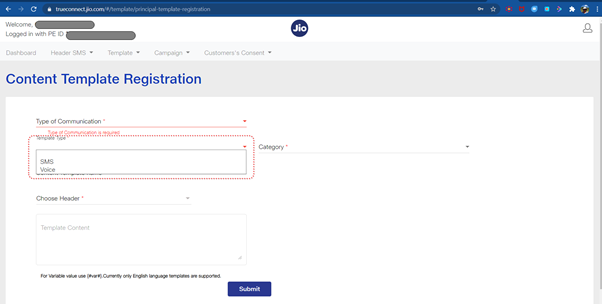
- Define template type - Promotional/Transactional/Service
-
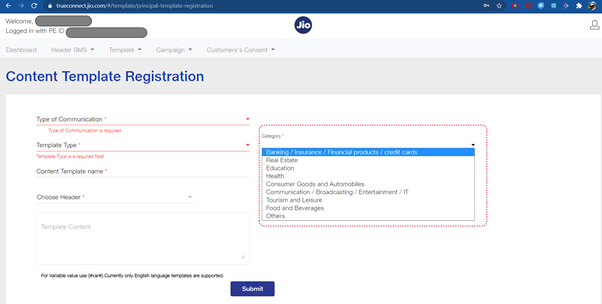
Select category of content and a registered header. The registered header should be available for selection basis category of content only - numeric for promo and alpha for Others Also keep in scope that in the end state we should allow the same header for all category types
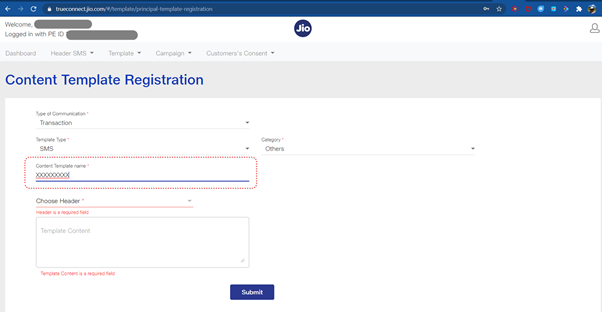
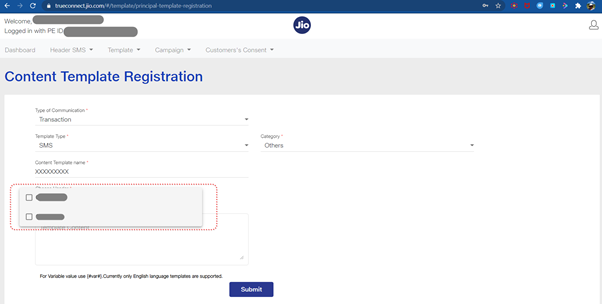
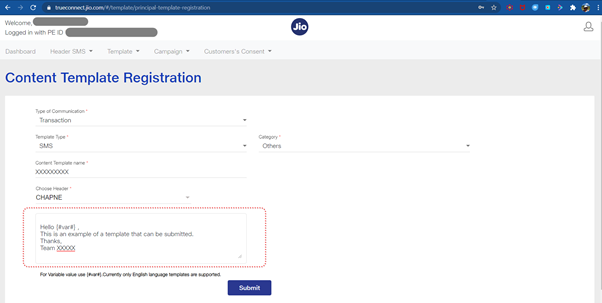
- Submit template for approval
- JIO's Registrar will validate and verify details provided by the Principal Entity
- On successful registration, the Registrar will approve and register content template ID on DLT platform
- The registrar will communicate successful registration or any discrepancy in case of incorrect details with the applicant on the registered e-mail and mobile number
Tata Content Template Registration Process
- Login to Tata DLT Platform using principal entity credentials
- Go to Content template -> Register new content template
- Define template type - Promotional/Transactional/Service
- Select category of content and a registered header
- Provide content for fixed part and mention variable content in the template as {#var#}
- Submit template for verification
- Content template registrar will validate and verify details provided by the principal Entity within 2 working days
- On successful registration, the content template registrar will actions (approve/reject) and post approval register content template ID on DLT platform.
- The registrar function will communicate successful renewal or any discrepancy in case of incorrect details with the applicant on the registered e-mail and mobile number in the defined TAT.
Videocon Content Template Registration Process
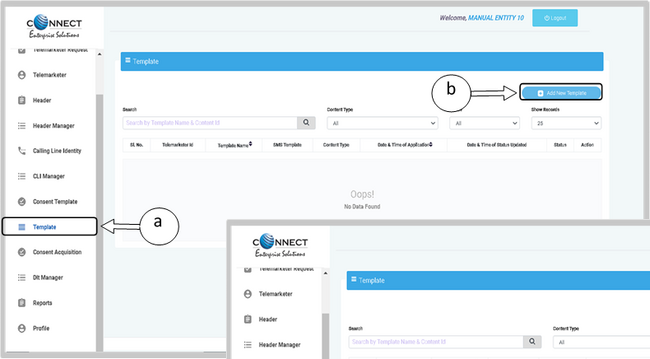
Templates are created for Commercial Communication and as per TRAI guidelines all the Principle Entities needs to register their Templates before sending Commercial Communication.- In the Entity portal on the side bar click on the Templates option to view the page
-
In the Template page click on Add New Template button to create new Templates
- Fill an appropriate Template name basis on the business requirement in the Template Name column
-
In the Communication Type column select the type of communication from the following:
- SMS
- Call
-
In the Content Type select any of the following options:
- Transactional
- Promotional
- Service Explicit
- Service Implicit
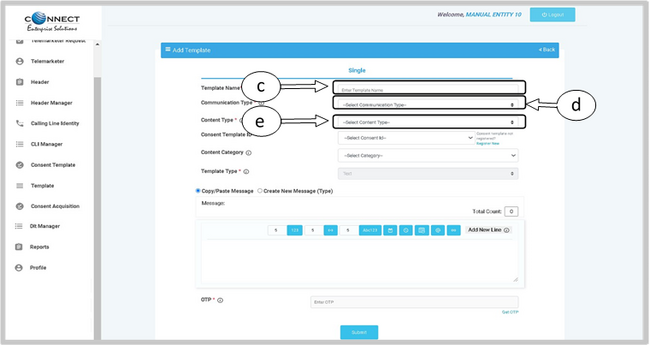
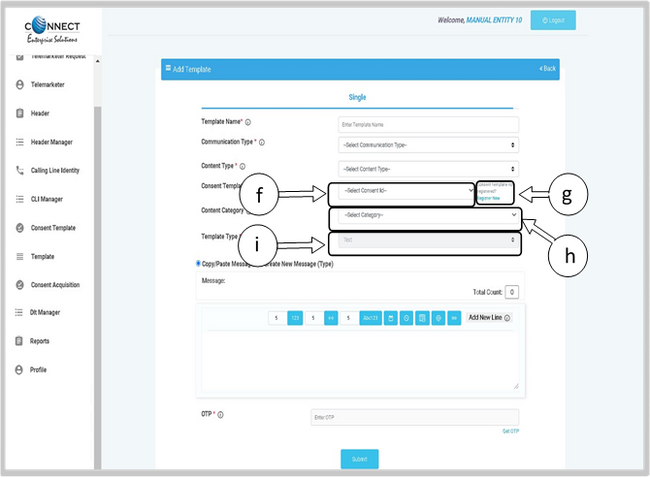
- In the Consent Template ID column select the relevant Consent Template registered on DLT from the drop-down list. Consent Template ID is not mandatory for Transactional and Service Implicit commercial communications
- In the Content Category column select any of the Categories from the drop-down list as given which is appropriate for the Template to be created
-
In the Template Type column, it will either be TEXT or UNICODE and it will be auto fetched basis on the selection of language for the content. Please note, any language other than English will be taken as Unicode
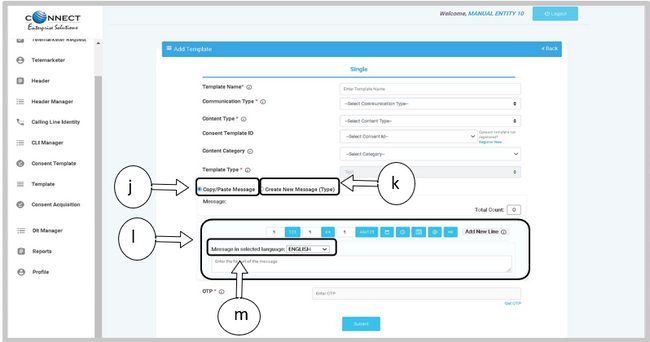
In the Content creation section, there are two options available:
- Copy/Paste Message
- Create New Message (Type)
- In the Copy/Paste Message option, copy any message and create the required content for the Template
- In the Create New Message option, type the required content
- In the Create New Message Box type the required content and to add variables there are options available on the panel
-
Messages in languages other than English can be created, such templates type will be treated as Unicode. Language can be selected from the drop down list
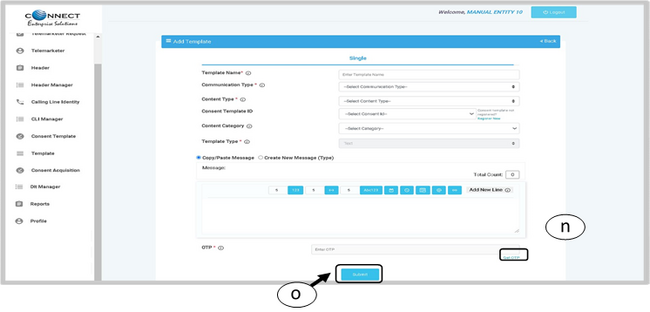
- Press the Get OTP link to receive the One Time Password on your registered mobile and email id. Once received, type the same in OTP column to authenticate the process
-
Press Submit button to confirm and send the request for approval by the Operator
Vodafone-Idea Content Template Registration Process
- Log into your account from VILPOWER Portal.
-
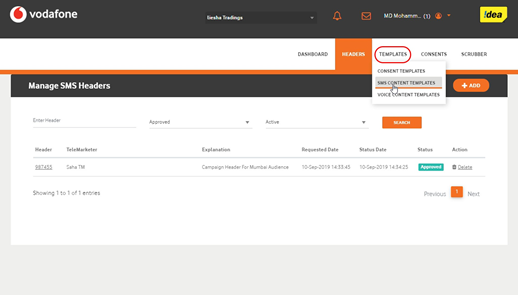
Choose template type - Promotional/ Transactional/ Service Implicit/ Service Explicit.
-
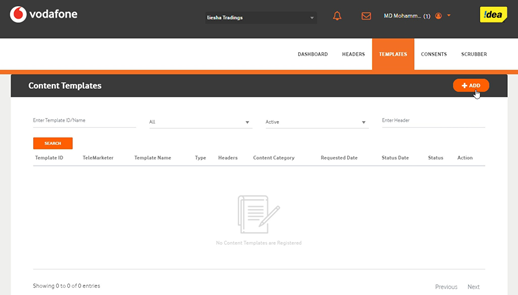
Select a category from the drop-down list and click on "+Add".
-
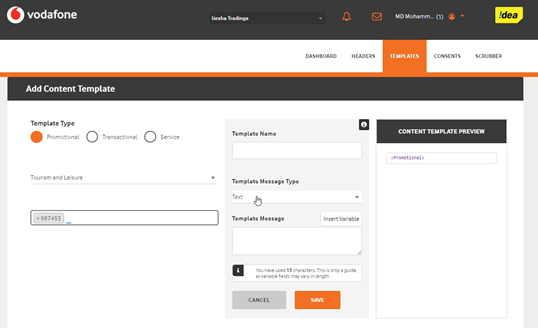
Search for the header you already created and select it
-
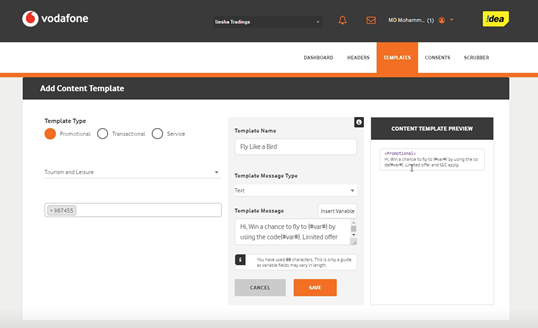
Enter template name desired and select template message type. Enter the message content and insert variable placeholders by clicking variable insert button wherever required.
-
Click on save.
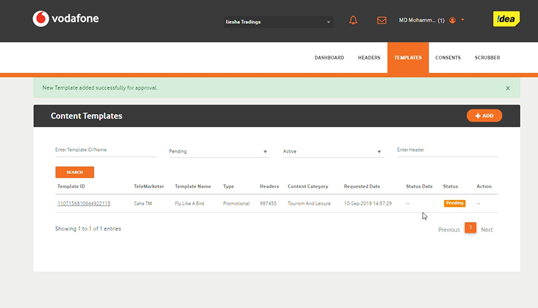
-
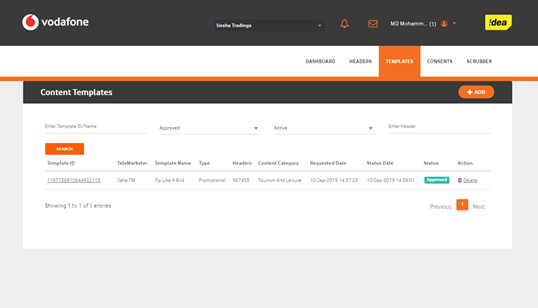
The status would change to 'Approved' once it is approved by the Registrar.
